| Common apparatus |
|---|
| Hydraulic system |
| Electronic components |
| Data acquisition |
| EMG monitoring |
| NLID Tools |
| Troubleshooting |
| Materials |
| Supine apparatus |
|---|
| Assembly procedure |
| Safety Measures |
| Components |
| Servovalve |
| Actuator |
| Potentiometer |
| Pressure Filter |
| Torque transducer |
| Boot |
| Literature |
| Computing resources |
|---|
| CVS |
| Ethics |
|---|
| SDS / Inventory |
|---|
Boot construction - Supine
In order to play the video clips below your multimedia player needs to have access to the DivX video codec. Version 5.0.2 is available here or you may download the latest version from DivX directly here. As an alternative, the videos were also posted on YouTube and links provided to then on this page.
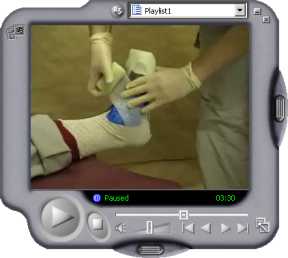
Casting (Wrapping)
Casting consists of wrapping the subject's foot with an orthopaedic (fibreglass) tape to produce a hard shell around the foot.
The subject wears a regular sock in order to protect their skin from the tape which would otherwise adhere to it. To facilitate the eventual removal of the boot the sock is further covered with a stockinet which slides off along with the boot.
A leather cutting guard is placed on the foot to cover the places where the cast will be cut in order to shield the foot from the heat produced in the process. Vaseline is first smeared on the top surface of the guard to prevent adhesion with the fibreglass tape.
A toe guard is fashioned from a piece of thermoplastic material to protect them from the pressure of the wrapping material as well as to strengthen the boot at the ball of the foot. Use hot (recently boiled) water to soften the material and mold it around the toes before it cools.
Wear gloves while wrapping the foot; they help to keep the tape resin off of your hands. Using 2 or 3 rolls of fibreglass (depending on the foot size), wrap the ankle in a figure 8 fashion.
While wrapping ensure that:
- The ankle is perpendicular to the tibia
- The fibreglass bandage does not wrinkle
- The bandage is stretched a little during wrapping
- There is enough material in the heel & forefoot regions.
After wrapping is complete, apply lotion to the cast and mold the latter. The small amount of water in the lotion serves as a slow catalyst in the setting process. Make sure the leg is straight and set the foot at approximately right angle to it.
Typically, the boot is set in about 10 minutes and is ready to be cut. (One occasionally comes across a pack of tape having more resin than usual. Setting time increases as a result.)
 |
|
Video: 6m 49s, 19.60 MB |
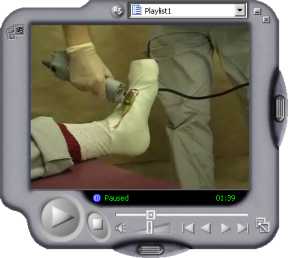
Cast Cutting & Marking the Malleoli
Part of the cast is cut away with a cast cutter to allow removal of the boot. Afterwards, the location of the malleoli are marked on the boot so that the ankle's axis of rotation may be determined later on.
The cast cutting tool is equipped with a vibrating blade that erodes the cast. The motion of the blade is relatively gentle on soft tissue, such as skin, where one feels a mere scratching, but is abrasive on hard substances such as the cast and bone.
After the cast is cut, mark the lateral and medial malleoli of the foot so that the ankle's axis of rotation can later be determined from these anatomical landmarks.
(Eventually, a boot tongue needs to be made. See below. It can be made either now or immediately before the subject is fixed into the experimental apparatus.)
Remove the boot and optionally rinse it in water to help the setting process. Regardless of what you do, allow the boot to fully set as per instructions on the casting tape (say, overnight).
 |
|
Video: 6m 35s, 20.05 MB |
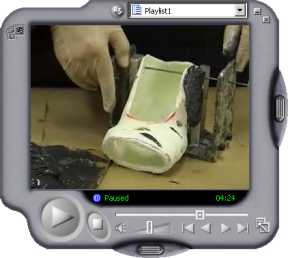
Trimming and Making the Axis of Rotation
The boot is trimmed of excess cast material around the ankle and toe regions. Also, from the location of the malleoli the ankle's axis of rotation is determined and holes are drilled through these latter two points.
Material around the ankle is removed to give the subject freedom to rotate their foot. The material around the toes is removes primarily to prevent the subject from generating force with their toes during the course of an experiment. Also, file away any rough edges.
Regarding the holes for the axis or rotation, they should be just large enough to clear a bamboo skewer (1/8 inch or 3.2 mm) which is used to align the boot with holes in the posts. (See section below.)
 |
|
Video: 1m27s, 3.88 MB |
Post Glueing
A pair of posts are glued to the sides of the boot so that it may be mounted onto the manipulandum of the experimental table.
The boot and posts are aligned with the help of a glueing jig. Epoxy glue is used to fix the posts to the boot. Mixing and glue application is a messy process. Wear a lab coat, gloves, and cover the work area with paper to keep the counter tops clean. Follow the mixing instructions on the epoxy canister.
- Mix 270g of resin with 30g of hardener to make epoxy.
- Use reusable silicon containers for weighing and mixing.
- Cover base of gluing jig with Vaseline to prevent adhesion of epoxy.
- Use bamboo skewer to align posts and boots. It can be broken and filed off after the glue has set.
- Clean instruments with paper towel. Do not rinse epoxy into sink.
Materials needed:
- 2 aluminum posts. (Prefabricated in the lab.)
- Vaseline and small application stick
- Container of water (used to mold the glue)
- Epoxy glue
- Paper to cover the counter top
- Lab coat and gloves
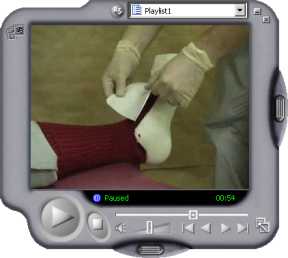
Making the Tongue
The tongue replaces the cast material that was previously cut off of the top of the foot. During an experiment, the tongue is placed over the top of the foot and is secured with a strap in order to better hold the foot in the boot.
With the subject wearing the boot, measure off and cut an appropriate piece of thermoplastic material that will cover the exposed top portion of the foot. Soften the thermoplast in hot (recently boiled) water and apply it to the foot, forming the piece to the boot cutout. Fold upward the edge of the material at the top of the foot to give clearance so that the subject may make dorsi-flection ankle movements. Let the thermoplast cool and become hard again.
 |
|
Video: 1m31s, 3.62 MB |
Last Modified: 2009-Oct-19 Ross Wagner